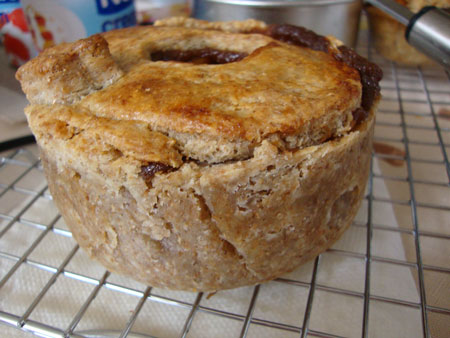
Today (Mar 28), I made pie for the first time in my life. I was hesitant about pies at first because of all the apprehensive pie bakers I've read about online that talk as if pie crust is the Holy Grail of baking. But the more I thought about it, the more I realized that I LOVE PIE MORE THAN CAKE, so I ABSOLUTELY HAD TO MAKE PIE (it was an intense itch), so I kept on reading a lot and absorbing information, took a deep breath, bought myself a baking mat and a rolling pin, and WENT OFF TO MAKE SOME PIES!!! :D
Originally I wanted to make Pumpkin Pie, which I believed to be the Best Pie Ever the first and last time I had a taste of it at the International Students' Pot Luck Christmas Party. But due to wanting to make my own pumpkin puree and not the canned kind and thus needing more time and effort for it, I decided to try instead another American favorite, Apple Pie.
The base pie crust I used is the All Butter, Real Flaky Pie Dough from SmittenKitchen. I wanted an all-butter crust and didn't want to mess around with shortening. Assembling the pie dough itself was easier than I expected (but this was probably also due to my extensive reading on the subject, I was prepared for everything). The real challenge, however, was in the ROLLING part, and then the actual BAKING part. Here are my notes:
PUTTING THE PIE DOUGH TOGETHER
1. I used 1 cup whole wheat flour plus 1 1/2 cup all-purpose. Taste was excellent. It was also easy to work with.
2. All utensils should be placed in the freezer/fridge beforehand. Premeasure the flour and chill in the freezer. Butter MUST be be frozen. The baking mat (which I use for rolling) should also be chilled.
3. I used the more expensive President brand of French butter and I believe it made a difference. The butter was a dream to work with, and had a pleasant buttery smell and pale butter color unlike local brands.
4. I was planning on grating the butter, but the grater I had was useless so at the last minute I cubed the butter. I had no pastry blender so I tried the fork method but found using my fingers the most efficient. It was pleasant doing this, actually. Only the fingers/tips should be used. The palms are warm enough to melt the butter. Again, COLD is the key.
5. I had slight troubles in putting together little mounds of dough for my mini pies, but that was because I wasn't sure how much dough I needed to fill each muffin pan.
ROLLING OUT THE PIE DOUGH
1. Pie dough straight from the freezer is too hard. From the fridge is best.
2. Again, chill the baking mat.
3. Our kitchen is too hot. The pie dough becomes warm in about 2 minutes. It really is best to work in an AC room.
4. It's better to place plastic wrap sheets between the dough - makes the dough MUCH easier to move and roll. It also saves the rolling pin from getting gunky and dirty.
5. Roll pie dough by turning the dough clockwise with each roll.
6. Don't roll out the dough too thin, as the filling may leak.
7. Do not overwork the pie dough. Handle it as little as possible.
ASSEMBLING THE PIE
1. Poke holes with a fork at the bottom of the crust to prevent it from bubbling up.
2. Apply a layer of egg white wash to prevent sogginess.
3. Hot temperatures make a lattice top virtually impossible. If I want a lattice top, I think I may have to freeze strips in the freezer beforehand.
4. Always make sure to chill the assembled pie beforehand, top crust and all. This prevents shrinking.
5. Make the top crust bigger than called for to make room for folding in the sides. Alternatively, I'm thinking of making a decorative braided edge.
6. Paint with egg wash (+ milk next time) for a shiny top.
7. Make sure there are no cracks at the sides.
BAKING THE PIE
1. Fruit pie filling bubbles up and releases juices, so it's best to bake with another pan underneath.
2. The top crust really does bake much faster than the undersides. I have to tent the pie with aluminum foil about 10 or 15 minutes into baking, (as soon as I see the top browning),
3. then I have to increase baking time to probably about 40 to 45 minutes. I used the #7 setting in the oven.
CONCLUSION:
For my first pie, I must say...the taste is superb!!! I am crust-lover (as long as the crust is worth it), and the crust was very flavorful indeed. It was sweet, but just the right sweetness. Even though the bottoms were undercooked and such weren't as flaky, the tops did show signs of flakiness. I'm expecting to get better and get good flakiness next time (though I think most people here, including myself, actually like the tenderness of underbaked crusts much better). But I want to try the 'classic' flaky way first.
For the filling, I used the recipe Apple Pie by Grandma Ople from Allrecipes since it has such rave reviews. I added a teaspoon of cinnamon, but McCormick cinnamon is so weak I couldn't even detect it! I'm thinking of investing in the more expensive organic cinnamon next time. Since I used muscovado sugar instead of brown (no decent brown sugar here), the filling was an intense dark brown and had a strong brown sugar taste. But still good, though my mom wanted it less sweet (I simply had too much syrup). Personally, I was surprised that the sugar mixture was not as sweet as I expected. I didn't think it was tooo sweet at all. But next time I'm definitely going to use a lesser ratio of syrup to filling! The filling wasn't liquidy (maybe because I frantically added a teaspoon more of flour than called for?) so I mixed the apples in them instead - not a bad strategy, actually. The Granny Smith apples were pleasantly tart, in contrast to the syrup. I'm thinking that next time I could reduce the butter as well, maybe to 1/3 cup.
These mini apple pies are definitely better than McDonald's Apple *cough* Chayote Pie *cough*. However, I am still on the lookout for the perfect Apple Pie filling. I am also going to add nutmeg next time.
Sunday, March 28, 2010
Saturday, March 13, 2010
Second Bake: Whole Grain Double Fudge Brownies
So today is another weekend, which meant that I was baking yet another project. This time a King Arthur Flour recipe. It's included in the Whole Grain Baking book and also in the website so I tried it out. I have to say, though I followed almost everything to a T, the result was a semi-disaster :(

First of all, the Whole Wheat Double Fudge Brownies were...okay. Okay, which means they're passable but not great. I realize now that my tastebuds have become so demanding that almost anything I would come up with would not meet my expectations. I'm starting to think now that the reason I thought I was an OK cook back in Japan was that back then, my standards were quite low - as long as it's edible, I could live with it. But not anymore. So, I have my work cut out for me.
I did some modifications, some to suit my tastes and some because I had no choice. Here are the changes:
1. Used 1 cup + 1/4 muscovado sugar vs. 2 cups of dark/light brown sugar. I originally was planning only 1 cup because I was putting in honeyed walnuts, but I tasted the mixed liquid ingredients and thought they were too bitter so I added some more.
2. Used 2 tsps. First Pick Nescafe Instant Coffee Powder instead of 1 tsp espresso powder. The result wasn't bad, but I think I'll stick with the recommended 1 tsp next time so the brownies wouldn't taste as dark.
3. McCormick Vanilla Flavor, as I couldn't find Vanilla extract anywhere! *sigh*
4. 5 eggs instead of 4 large eggs, since eggs here are puny. I used the conversion guide here.
5. Added honeyed walnuts.
COMMENTARY:
I used a 500-gram bar of the Tulip brand of semisweet chocolate that I chopped up into morsels - bought at SweetCraft because it was ultra cheap (about Php 80). I tasted it a bit while I was chopping. It tasted like cheapo chocolate. Personally, I wouldn't eat it even if I was paid, but I guess it was OK for trying out baking with chocolate. I was hoping the cocoa and other stuff would cancel the horrible stuff out - and yes, that was what happened. It didn't taste horrible in the final product, but I'm going to buy something better (even if it was more expensive) next time!
The book recipe, which is what I followed, called for mixing the baking powder with the liquid ingredients, while the online version called for mixing the baking powder with the flour. I think I'll stick with mixing the baking powder with the flour as an extra protection against activating the baking powder.
I think I may have overmixed the batter a tad, but nothing so major. The BIGGEST BLUNDER I did, however, was that after I had the batter and the greased pan with parchment all ready, was that I realized I didn't have the oven preheated!! What a terrible mistake!! I'm afraid the extra time waiting for the oven to heat up may have negatively affected the batter. And not only that, I think I had some oven temperature problems. Because I was in a hurry, I may not have set the oven temperature right. Due to space constraints, the thermometer was in front of the oven door, and the temperature reading may have been lower than it really was at the middle. I set the temperature at 325F (25F lower due to a darker, nonstick pan), and according to the oven thermometer, the optimum setting was between 6 and 7. However, I'm thinking I may have had better results if I set the correct temperature during preheating in the first place, and not have to bother with constant readjusting, which may have had a negative effect. I set the timer at 24 minutes (5 minutes less than the recommended time), but the edges weren't shrinking so I set it another 8 minutes. I remember that I was smelling a slightly burnt chocolate smell about 15 - 20 minutes in. After 32 minutes, I realized the edges weren't shrinking at all, and when I pulled out the pan and checked the center with a toothpick, it came out totally clean - UH-OH. I didn't care anymore about letting the brownie rest in the pan overnight. I cut it immediately as soon as the pan would allow, and my fears were confirmed - overcooked brownies with very hard edges, no thanks to the nonstick dark pans.
So now I'm stuck with brownies with very hard tops and a dense cake-like texture, kinda like a cake that has gone hard. I'm very disappointed, but I'd like to try the recipe again with new strategies. Here are the modifications I'll do next time:
Planned Modifications:
1. Mix the baking powder with dry ingredients.
2. Use better chocolate
3. Use an aluminum pan - IMPORTANT!
4. Scale the recipe for a smaller pan - the yield is too high.
5. Check the cooking time very early - maybe as early as 15 mins. Laura did say that she takes out brownies early because they continue cooking while in the pan.

First of all, the Whole Wheat Double Fudge Brownies were...okay. Okay, which means they're passable but not great. I realize now that my tastebuds have become so demanding that almost anything I would come up with would not meet my expectations. I'm starting to think now that the reason I thought I was an OK cook back in Japan was that back then, my standards were quite low - as long as it's edible, I could live with it. But not anymore. So, I have my work cut out for me.
I did some modifications, some to suit my tastes and some because I had no choice. Here are the changes:
1. Used 1 cup + 1/4 muscovado sugar vs. 2 cups of dark/light brown sugar. I originally was planning only 1 cup because I was putting in honeyed walnuts, but I tasted the mixed liquid ingredients and thought they were too bitter so I added some more.
2. Used 2 tsps. First Pick Nescafe Instant Coffee Powder instead of 1 tsp espresso powder. The result wasn't bad, but I think I'll stick with the recommended 1 tsp next time so the brownies wouldn't taste as dark.
3. McCormick Vanilla Flavor, as I couldn't find Vanilla extract anywhere! *sigh*
4. 5 eggs instead of 4 large eggs, since eggs here are puny. I used the conversion guide here.
5. Added honeyed walnuts.
COMMENTARY:
I used a 500-gram bar of the Tulip brand of semisweet chocolate that I chopped up into morsels - bought at SweetCraft because it was ultra cheap (about Php 80). I tasted it a bit while I was chopping. It tasted like cheapo chocolate. Personally, I wouldn't eat it even if I was paid, but I guess it was OK for trying out baking with chocolate. I was hoping the cocoa and other stuff would cancel the horrible stuff out - and yes, that was what happened. It didn't taste horrible in the final product, but I'm going to buy something better (even if it was more expensive) next time!
The book recipe, which is what I followed, called for mixing the baking powder with the liquid ingredients, while the online version called for mixing the baking powder with the flour. I think I'll stick with mixing the baking powder with the flour as an extra protection against activating the baking powder.
I think I may have overmixed the batter a tad, but nothing so major. The BIGGEST BLUNDER I did, however, was that after I had the batter and the greased pan with parchment all ready, was that I realized I didn't have the oven preheated!! What a terrible mistake!! I'm afraid the extra time waiting for the oven to heat up may have negatively affected the batter. And not only that, I think I had some oven temperature problems. Because I was in a hurry, I may not have set the oven temperature right. Due to space constraints, the thermometer was in front of the oven door, and the temperature reading may have been lower than it really was at the middle. I set the temperature at 325F (25F lower due to a darker, nonstick pan), and according to the oven thermometer, the optimum setting was between 6 and 7. However, I'm thinking I may have had better results if I set the correct temperature during preheating in the first place, and not have to bother with constant readjusting, which may have had a negative effect. I set the timer at 24 minutes (5 minutes less than the recommended time), but the edges weren't shrinking so I set it another 8 minutes. I remember that I was smelling a slightly burnt chocolate smell about 15 - 20 minutes in. After 32 minutes, I realized the edges weren't shrinking at all, and when I pulled out the pan and checked the center with a toothpick, it came out totally clean - UH-OH. I didn't care anymore about letting the brownie rest in the pan overnight. I cut it immediately as soon as the pan would allow, and my fears were confirmed - overcooked brownies with very hard edges, no thanks to the nonstick dark pans.
So now I'm stuck with brownies with very hard tops and a dense cake-like texture, kinda like a cake that has gone hard. I'm very disappointed, but I'd like to try the recipe again with new strategies. Here are the modifications I'll do next time:
Planned Modifications:
1. Mix the baking powder with dry ingredients.
2. Use better chocolate
3. Use an aluminum pan - IMPORTANT!
4. Scale the recipe for a smaller pan - the yield is too high.
5. Check the cooking time very early - maybe as early as 15 mins. Laura did say that she takes out brownies early because they continue cooking while in the pan.
Saturday, March 6, 2010
First Bake: Whole Wheat Banana Bread

When I came home this weekend, I had a lot of pleasant surprises waiting for me. I had 5 packages in! One was from Chad Lawson, who generously gave me his CD, "Set on a Hill". It's an album full of beautiful and soothing solo piano music. I'm really happy that he remembered. I wish I could give back to him in some way, but I don't know how!
My other packages were from Betterworld Books and Amazon. One of the Betterworld package came with a nice milk chocolate bar with rice crispies (Divine, a fair trade chocolate company). I munched on it while browsing my new books - it was quite good, considering that I don't really like milk chocolate anymore nowadays. Even better the next day after I put it in the fridge.
My new books were a couple of cardmaking books, Nyan's origami book, and the stars of the show, my TWO new baking books dedicated to healthier baking. One was the 2nd hand Pillsbury Healthy Baking Book, and the other one was my much-awaited King Arthur Flour Whole Grain Baking Book. I love them both, though I think the KAF book might be more practical considering that the information about whole grain baking is newer and if focuses solely on whole grains (the Pillsbury book dates from 1994), but at least the Pillsbury book has a lot of reduced fat and half-whole wheat recipes.
So I decided that after all the research and dreaming, it was time to do some BAKING! But before that, I went to Marquee Mall and shopped for MORE supplies - I have a knack for hoarding all sorts of kitchen stuff as though I was a pro and racking up huge charges in the process, since my "perfectionist" streak always gets the better of me. However, I did chance upon a lot of useful stuff, such as a silicone spatula, a nice wooden spoon, lots of Baker's Secret Pans that are affordable considering the bump in quality, and wonder of wonders - an oven thermometer! I never dreamed I'd find one in Angeles. I ended up with 800+ PHP measuring cup and spoon set, though. These babies better be worth it!
So for my first try, I chose Whole Wheat Banana Bread from the Pillsbury book, since it's a quick bread and is supposedly very forgiving. I checked the recipe vs. Laura's and the only differences are the half whole wheat flour and the salt so I went ahead and did the Pillsbury version. I have to say, I think I chose the right recipe - it is indeed very forgiving, despite the numerous blunders I made along the way.
List of blunders:
1. I melted the butter in the preheated oven. The common way to melt it is through stovetop or microwave. Still, can't the oven suffice? I was scared I might do something to the butter so I removed it while it still had a few lumps, but I don't see any adverse effect.
2. I immediately put in the sugar together with the flours. It was supposed to be mixed into the butter. I was praying it wouldn't spell disaster. Fortunately, it didn't (thanks to the forgiving recipe).
3. The butter clumped up when I put in the water into the egg-mashed bananas-butter mixture. I briefly placed it in the oven so the butter will melt a little. Thankfully, I don't notice any ill effects (see how forgiving it is?)
4. The last 1/2 banana I put in wasn't mashed properly, and as a result I see some banana bits in the bread.
List of changes made:
1. Used approx. 2/3 cup sugar instead of 1 cup.
2. Baked approximately 35 minutes at 350F instead of 55 to 65 minutes
3. Used 1 mini loaf nonstick pan and 1 7" aluminum loaf pan.
4. Used 4 bananas (the lakatan were a bit on the small side; instead of 2 or 3)
I was scared I was overmixing the batter, so I tried as much as possible not to move it around too much. The banana bread wasn't dense, so maybe I did the mixing right or it was just the baking soda or the 2-time sifting. It was very nice watching the bread puff up in the oven. My oven thermometer is heaven-sent. I immediately found out that our oven is 25F off, so I adjusted the temperature - achieved a perfect 350F. However, I just couldn't make up my mind whether the bread was done or not (the crust was puffy, brown and developed early on which scared me) so I ended up bringing out and putting back the mini loaf pan into the oven. I set my timer at 45 minutes, but in the end I think I only managed barely 35 minutes due to my impatience and paranoia. But still it's a good thing, because I learned a few things:
1. Nonstick bakeware develop an nice brown crust and cook faster. According to the Baking 911 site, when cooking with glassware or darker nonstick pans, one should lower the temperature by 25F.
2. The aluminum pan loaf, though cooked a bit longer (due to not having been brought out), did not develop a crust at the sides and could have stood baking a few more minutes (maybe 45 mins. or more).
3. Nonstick bakeware are great for pound cakes due to the nice even crust. Aluminum pans are good for achivieng no-crusts.
4. Both of the cakes were easy to remove, the nonstick one a bit more so. I butter-greased the bottoms only.
Suggestions for next baking:
1. Cut the sugar to 1/2 cup, Mommy's request
2. Add more bananas (2 more, or 6 bananas total).
4. Add nuts (walnuts!)
5. Lower the temperature by 25F, increase baking time to at least 45 mins (though checking carefully after 35 mins).
6. Invest in 2 more mini loaf pans. They are a great size!
7. Thoroughly melt the butter.
8. Consider adding lukewarm water next time (prepare in advance, and not from the tap!)
Others:
1. Buy some baking gloves
2. Get a flour sifter, so the flour doesn't fly all over while sifting.
All in all, I'm still very pleased with my first try. The gods (or GOD), must be smiling down on me today :) I can't wait to bake more next week! :D
Thursday, February 25, 2010
Not-so-hot pork and cabbage stir-fry :(
So I challenged myself to another dish tonight. It's a simple pork-and-cabbage Japanese dish that I first had the priveledge of eating when I ate dinner at Hiro-kun's house. I got the recipe from his dad. It's very simple. Miso + mirin + sugar. I didn't get the exact measurements, but I adjusted it according my taste, and it turned out delicious the first time I tried it, albeit a bit soggy. So I decided to do round 2 this time.I wanted to get it right this time, with crunchy cabbage and sticky sauce. The last time I made it, the stir-fried meat looked more like boiled meat, so I made sure the meat was dry and that the pan was hot. The first few strips seemed to cook and brown nicely, but after I put in all 270 grams of pork slivers, the pan was very crowded and probably due to the drop in temperature, the pork started to boil, not fry! :( Maybe it's really impossible to put in so much meat at the same time? Do I need to study the art of stir-frying after all? (Probably, yes.) I put in a dash of pepper on the meat, since it's the kind of thing I would do.
The next major problem was the vegetables. I was afraid the meat might overcook so I removed them from the pan while I sauteed the onions and red peppers (just to add color). Then the cabbage came. I wanted to cook the cabbages only lightly, but it was very difficult to work with them as my pan was too small and there was simply too much cabbage, even after I threw away lots (I was using a medium-sized cabbage). Arggh. Next I put in half the miso-mirin-sugar sauce, and tried to mix everything in before I added the meat. Here is where I did my greatest blunder. Thinking that the sauce was too dry, I added in more mirin. Big mistake. While it cooked, the water level seemed to rise higher and higher (seeping from either from the miso itself or the vegetables?) My stir-fry ended up looking more like soup :( It was even soggier than my first try. I have only my impatience to blame.
Still, the great thing about this dish is that it still tastes relatively nice soggy vegetables and all. But I'm very unhappy about it, especially since I probably have to eat the leftovers for about a week D:
The next time I cook this dish, I plan to keep Kentaro Kobayashi's (Bento Love cookbook) advice to heart: Don't overcook the cabbage and keep the sauce under control.
And I had this book all along. Drat.
Wednesday, February 24, 2010
Ginisang Pechay and Corned Beef a la Tintin

Dinner today was a simple affair. I just heated up the Ginisang Pechay I cooked up last night and sauteed the premium version of Argentina corned beef sitting in my cupboard. It cooked up fast, and was totally fuss-free unlike my other fancy recipes. And to my surprise, it made for a very satisfying meal. It's not perfect (I have never made something I was totally satisfied with - yet), but I'm proud that I can finally cook up a decent meal, even though sauteed corned beef doesn't really count as cooking since it's from the can. But corned beef isn't such a simple affair, as I learned the last time I cooked some and ended up with undercooked potatoes and a taste I wasn't happy with, at all. I wanted corned beef that tasted the way Mommy cooks it.
Here's my recipe:
1 can (210 g) of Gold Label Argentina corned beef
1 medium sized red onion, chopped (or half - I like lots of onions, so 1 onion is OK for me)
1 biggish potato, diced
1 tablespoon patis (fish sauce), to taste (I'm planning on cutting down to 1/2 or 3/4 next time)
1 tablespoon cooking oil
Fry the potatoes (diced small) on hot cooking oil and saute them for a while on medium heat (on my electric stove) until all the oil has passed through them and they turn a darker shade of yellow. Move them to the edge of the frying pan and put in some more oil (I used the oil sitting on top of the corned beef) then toss in the onions. When they're half-cooked, fold in the potatoes at the edge and saute the potatoes and onions until onions become translucent. Next, put in the can of corned beef and mix well. Cover for 5-7 minutes, until potatoes are of the desired tenderness and meat looks cooked. Add patis to taste. Done!
I was very happy that this time, the potatoes were nice and soft (but not overdone). And thank goodness I overcame the compulsion to add black pepper! (I am a black pepper addict and put several dashes of the stuff in everything). It does taste like Mommy's, maybe even (slightly) better. It seemed there was a bit more potato and onion in it than meat, though, but I don't mind that so much. Good extenders! Anyway, Yosuke did say he likes potatoes in corned beef. I'm trying to eat less meat. The one biggish potato left in my vegetable bowl sufficed, and I realize now that I always put in too many potatoes, ingredients, and spices in my cooking. Really, moderation is the key. Next time I will also cut back a bit on the patis since I can tolerate less salty foods.
Now for the Ginisang Pechay. This was the biggest breakthrough for me in a while. I like pechay (I love my greens), but there's something about the 'acidic' taste in pechay that I don't find appealing. The funny thing is, I've been eating pechay all my life and it was only recently that I noticed the 'acidic' taste (My tastebuds are getting more sensitive, especially after I left Japan and now that I'm starting to cook). I believe the acidic taste is what separates pechay from my favorite dark green vegetable and Popeye's food, spinach. For some reason, spinach is just divine.
So I was cooking the ginisang pechay late last night and wondering what spice or flavor I could use to give it a twist, especially since the water and pechay had started boiling and I could smell the acidic smell - quite unappetizing. I had very few spices on hand, so I decided to take the plunge and put in a few dashes of dried McCormick oregano, which I love so much in tomato dishes. The wonderful oregano smell quickly overpowered the acid, but I had yet to know how the taste would be. I cooked the pechay quickly so it won't be overcooked (to my standards. Then I added in a couple of dashes of my ever-favorite black pepper.
I had to admit I put in a bit too much oregano since the opening from the spice bottle is big and oregano, I think, is best placed on a spoon to prevent accidents while using, since it's such a strong herb. Still, it didn't affect the taste, and I had a fragrant ginisang pechay with no acidic taste. Hurray! :D
Tuesday, February 9, 2010
Bulgogi

My first time to try a recipe from the Good Housekeeping cookbook vol. 6. I've amasses a pile of local culinary magazines the last few days and so far, it's the first two I got - the Good Housekeeping tomes, I see as being the most practical. My first try is the Beef Bulgogi, a simple Korean recipe with 2 steps and all the necessary ingredients in my pantry. I remember how much I savored the Bulgogi made by Harry's wife and replicating it seemed like a wonderful idea. The recipe didn't call for any onions, but that's how I remembered the good Bulgogi to be so I added in a nice big yellow onion and about 1.5 additional teaspoon of the liquid seasoning. The recipe was to be fried or grilled, and the photo certainly looked like dry bulgogi, but my attempt produced a watery version - not really bad, because my favorite bulgogi was watery too. Still, I wonder if I should've gone the dry route and added in the beef into the pan very slowly to sear the meat. I put everything in and the pan temperature certainly dropped. Maybe I should put more attention to that pan temperature thing always touted in cookbooks. Anyway, the beef was boiled more than fried.
The result? The dish did look good, and I think the beef was cooked just right. Cooking time was short due to the thin cuts. The taste? It's...good, but unfortunately after eating such spectacular bulgogi in the past, my personal attempt seems quite dim. I followed the recipe (almost) to the letter, but I think there's something missing from it. I was itching to add in some cracked peppercorns while I was eating, much like how I do my standard donburi. Did the good bulgogi have pepper in it too? I don't remember.
The sweetness was light, to my surprise (I was expecting it to be quite sweet due to the sugar). It did smell like bulgogi at close sniff, but somehow even the smell seemed several levels dimmer than Harry's wife's version. It suddenly made me think about "umami" and left me wondering if adding a dash of aji-no-moto would solve the problem. (Not that I would put any of that MSG stuff in my food!)
Would I make this again? Yes, but not without some variation. Maybe I should've added some more sesame oil? Threw in peppercorns? I really don't know. I may look at online bulgogi recipes and see what others do. But maybe the best bet is to ask Harry's wife after all.
------
Edit: After looking through online recipes, I came across some interesting points:
1) They all had ground black pepper
2) some call for white cooking wine (sake or mirin)
3) some also call for pear juice
4) some recommend toasting the sesame seeds
5) the marinade is not included when searing the beef
6) a lot of recipes call for grilling, but using a skillet is OK too.
7) It's probably best to use good quality soy sauce, not the Philippine kind.
Hmmm...I'm disappointed that Good Housekeeping has a recipe that leaves out the black pepper! Apparently it leaves something to be desired. Now I'm a bit hesitant of the other recipes in the book...
Wednesday, February 3, 2010
Roll Cabbages
← The plain steamed version of the cabbage rolls.
I finally made the roll cabbage recipe I've been meaning to try cooking for 5 years now. Is it edible? Yes. Is it delicious? ..Yes. Am I satisfied? No.
I had a bunch of blunders which made the food less than satisfactory, though thankfully not enough to ruin it. The list of improvements I'm planning to do next time are:
1. Pay more attention to the cabbages while preparing them to be soft enough for rolling. I think I slightly overcooked them.
2. I think I can use slightly less ground meat and it'll still taste great (hooray for a healthier recipe!)
3. Use only a pinch of salt in the mix. I overdid it this time. I didn't mind lots of black pepper powder, though.
4. The leftover cabbage from the hard stalks chopped up and mixed make a good and healthy filling.
5. Cook the butter on low heat! (of course, the dang electric stove is partly to blame for this) I also don't need much butter. The 15 grams called for was more than enough.
6. Immediately turn off the heat when fine bubbles form on the butter-and-flour mix.
7. Use only half the Knorr broth cube. That and the salted butter + too much salt in my meat mix was the downfall of my recipe. Too salty for my taste, though thankfully still edible.
8. Use the biggest cabbage leaves from the biggest cabbage I can find. They're easier to roll and look better.
I seriously think I have some issues with either too much sodium or MSG. Maybe it's the sodium, or both. I get the same slight headache when I eat instant noodles, even though it's my favorite Lucky Me. So, it's best to cut down, I guess.
------
I steamed the leftover rolls for dinner tonight. So now I can directly compare them with the buttered versions.
1. The taste is just right, maybe just a little too salty for my taste which means that I definitely overdid it with the salt. Now that I think of it, the bacon was probably already salty too.
2. No significant loss in taste, just less "savory" and strong.
I think I'll stick to steaming next time. Less calories and no MSG. I'm thinking of incorporating some butter into the meat mix, though. And no Knorr.
Subscribe to:
Posts (Atom)