Showing posts with label whole wheat. Show all posts

Monday, May 10, 2010

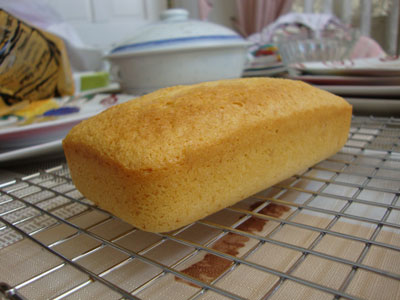
Condensed Milk Pound Cake


This week, I decided to try out recipes using simple and easily available ingredients, so I tried out this Condensed Milk Pound Cake recipe. The recipe came from here.


tight crumb, simple but delicious flavor.

My variations are as follows:
1. I lessened the sugar from 45g to 30g, and increased the condensed milk a tad (about 1 tbsp to account for the whole wheat flour).
2. The original recipe called for cake flour. I used my Whole Wheat Pastry flour.

Doubling the recipe makes 3 mini loaves. I put a lot of vanilla extract (1 1/2 tbsp) the first time, and I thought the vanilla flavor was slightly overpowering. So next time (for 2 loaves) I put in only 1 tbsp but this time I miss the vanilla flavor!

For the bigger pound cakes, I had to tent them with foil (20 minutes in for lesser browning). The top of my oven really is too hot.


Nyan said it was too buttery(!?) Never mind, I don't trust her judgment much. The cake did taste better and was moister the next day. I find it a tad too dry, though. It wasn't as soft-looking as the original blog pic. But it's not bad either, (tastes quite good out of the oven actually), so I'll definitely be making this again next time I need a simple pound cake recipe.

Friday, April 30, 2010

Chocolate Pound Cake

I've been working almost exclusively with chocolate these past two weekends. Making chocolate cakes and treats has always been one of my goals. It surprises me that I haven't started working on chocolate sooner! Or maybe not, because of the Whole Wheat Brownies disaster previously...

The batter is best filled up to near the brim. They do puff up a lot.

Since I wasn't keen on another chocolate disaster, I decided to try out a simple chocolate pound cake recipe. It was also an excuse to try out my new fancy baking pan that I bought for cheap from Living Well at the Podium. The pound cake is mostly made from whole wheat pastry flour (plus a bit of bread flour), straight from the King Arthur Whole Grain Baking Book. I followed the recipe to the letter the first time I tried it out, except that I slightly reduced the sugar (about 1/4 or 1/3 - I'm not sure anymore). I converted most of the units to grams, since I halved the original recipe and working with volume measurements was getting unwieldy. I wanted to use good quality Dutch Cocoa so I settled for using the Ghirardelli Sweet Chocolate one, so I had to adjust the sugar quantities too. I think it made a difference. I wish I could find some good quality Dutch-process cocoa soon. I find it strange that Dutche brand Dutch cocoa isn't dark at all!

Beautifully formed pound cakes

The cakes formed beautifully. I dusted powdered sugar on them, only to find out later that powdered sugar is best put immediately before serving since a few hours later, the powdered sugar absorbed some of the liquid and turned into an appetizing mess on the cakes. I don't know if it was also responsible for the much drier cake I ate just a few hours later. It was a disappointment because the cakes were wonderfully moist and chocolaty when they were fresh out of the oven. Somehow, the taste and texture changed after just a few hours!


The first batch was moist and soft and chocolaty a few hours after coming out of the oven.

I decided to rectify the dryness issue the 2nd time around (this weekend) by adding about 45g or nearly 1/4 cup of sour cream. The sour cream considerably changed the consistency of the cakes. They were much softer so the mold wasn't as well-defined. I brought some for Nyan on the same day and she said she couldn't taste the chocolate, and that they were too greasy. I really don't know why theses pound cakes quickly lose their chocolate flavor... :( They were really great about an hour from the oven. But they were indeed a bit greasy, since the next day, I tasted them and they did remain moist but had this grease-like film. Maybe I overdid it with the sour cream. I should probably only put in a couple of tablespoons next time.


Another breakthrough I had the 2nd time around was with creaming the butter and sugar. I still don't know if I indeed did it right, but this time, I used butter straight from the fridge and creamed with a hand mixer it until it was as fluffy as I thought it would go without falling apart. The butter did change color - it was lighter looking. The batter was also less fluid when I put it into the pans. I filled the pans near the brim and succeeded in filling the whole pan without any leftovers. Hooray! Half the recipe is just right.

I was going to declare this pound cake recipe a keeper, but the disappearing chocolate flavor is very disturbing. Maybe it's not the recipe's fault but rather the cocoa I'm using? I have to get hold of better cocoa (the Ghirardelli can is nearly empty, anyway). So for the meantime, I'm still on the lookout for another chocolate pound cake recipe.

Sunday, April 11, 2010

Like Pancake in a Muffin ⇒ Sour Cream Muffins

Early this morning while I was between dreaming and being woken up by the blast from the TV morning mass, my mind was in overdrive thinking what to do with the leftover Nestle cream from the cheesecake I made the previous night. Use it as ganache for the whole wheat chocolate cake I've been meaning to try? Cookies? I'm sure about half a dozen possibilities came to me, but just before we set out to go for the mass (the real one), I settled on making the Sour Cream Muffins from my King Arthur Whole Grain Baking Book.


So I removed the cream and the eggs from the fridge right before we went out, so when I came back, the cream was no longer thick and both the eggs and cream were in room temperature. Then I decided to do the cream + lemon juice = sour cream substitute trick in earnest. I didn't think I did it well enough last time, but the conditions were perfect this morning because I had lots of time, the cream was room temperature, and it was very warm in the kitchen. I squeezed in about 5 pieces of calamansi juice, stirred the mixture, and left it alone... after about 20 minutes or so, I was surprised that the cream actually curdled!! I'm not sure if it's real curdling I saw, but the cream did get thick, and it smelled sour. I was very pleased with the result. However, I was not pleased at all when I noticed halfway through sifting the flour that I only had 1/2 cup of sour cream! I needed 1 cup, especially after I had already measured and mixed the required amounts of flour and baking soda! This was my fault for being a dummy and not preparing ingredients in advance.

Already my mind was in overdrive, but thankfully all the baking blog reading paid off - because I found the good sense to substitute instead the pack of yogurt I had left in the fridge (thank goodness I bought 2 yesterday!), then to increase the butter to compensate for the lost fat. Well originally I was planning to use 1/3 cup of butter instead of 1/2 cup (basically what I had left of a package after the PB muffins and cheesecake) but I didn't want to risk it so I used up part of an unopened package of butter to come up with roughly 1/2 cup of butter. Not too bad; it still has less fat than the original. I also subbed Whole Wheat Pastry Flour instead of White Whole Wheat, and I can't say the change had a negative impact.

the first batch didn't puff up much

The original recipe called for mixing in berries or chopped stone fruits, such as peaches. Well, no berries here, and I didn't want to open the can of peaches in light syrup I bought 'cause I'm reserving that for peach pie. We, however, had bananas, grapes, oranges, one Granny Smith, and a bunch of Fuji(?) apples in the house. Apples aren't stone fruits after all, but I decided to try my luck with a chopped Fuji and Granny Smith, then tossed in some nuts for good measure. I made sure to toss them in a bit of flour before mixing into the batter.

I creamed the still-cold butter and sugar (2/3 cup) using my hand mixer, and I think it went well, even though I did the creaming in the warm kitchen. Everything went smoothly from there, except that at the VERY END, I found out that the batter had to rest in the fridge for about 30 minutes - the one time I've preheated the oven for good measure, it wasn't needed at all! Arggh! Well I wasn't about to let the electricity get wasted more than it already was, so I popped in the muffins without the fridge rest. I don't mind the texture of bran, anyway. There was quite a lot of leftover batter that made 4 big muffins with my extra muffin pan, and that went chilling in the fridge.

I was hoping for the best, even though I was concerned that the recipe called for only 1/2 tsp baking soda and 1 1/2 tsp baking powder, so the chilling might affect the rise. In fact, I think it did, because my first batch of muffins didn't get a nice high mound on top unlike my 2nd batch, though I'm suspecting the nonstick pan might also have a part, because I always get ridiculously high rises and mounds when using that pan.

The taste, however, was heavenly. They smelled really nice coming right out of the oven, and when Daddy and I digged into the first one, oh, it was heaven! Moist and creamy and delicious! Didn't taste sour at all, despite being made from sour cream. Hands down the best muffin I've made to date. It kinda smelled and tasted like pancakes, and the apples carried themselves quite well, considering. They also got the thumbs up from my Mom, because they were not too sweet. The batter really is versatile - you could probably toss in just about anything in there and it would still be delicious. This muffin is a certified BAKING SUCCESS!! :D No wonder the King Arthur Flour bakers placed the recipe first, and were singing praises about it!

big brother muffin with puffed tops, and little sister muffins

Of course, there are always a few notes to consider when baking next time:

1) Prepare all ingredients beforehand!
2) DO NOT preheat the oven.

3) Make sure the cream and eggs are at room temperature before starting, or curdle the cream in advance.

4) Make sure to prepare 1 cup of sour cream + juice of about 8 calamansi

5) Fill the muffins almost to the brim (but not too densely) to get a nice high top.

6) Should I consider getting an ice cream scoop to put the batter in? It's getting to be a pain...

7) Brush the muffin liners with vegetable oil way in advance, or maybe while the batter is chilling. It does help keep the muffins intact.


All in all, this muffin recipe is definitely a keeper!!! :)

soft, creamy, moist crumb

Taking over REESE ⇒ Peanut Butter Muffins

Last Friday, I was seriously itching to bake something to bring to Nyan's house. I don't know how it happened that I have a ton of ingredients at home and NOTHING to bake - there was always some stray ingredient or so that prevented me from trying out the recipe. I consulted my numerous books and finally decided on a recipe that could be cobbled up pretty quickly and whose ingredients I already had in the pantry or could be bought quickly at the local supermarket. The recipe was PEANUT BUTTER MUFFINS, courtesy of the King Arthur Whole Grain Baking Book.


The recipe called for buttermilk, and I had just bought a bag powdered buttermilk from Chocolate Lover so I was eager to use it. But I was a bit dismayed after I mixed in the powder and tasted it - it tasted just like regular, cheap skimmed milk!! What's the the difference between the buttermilk powder and Bear Brand? It didn't even taste sour. But I gave it the benefit of the doubt so even if I was dubious, I poured it in.

I had leftover chocolate chips in the fridge and a can of honey-roasted peanuts and cashews lying around the house, so I crushed those and tossed them in the batter (lightly floured, of course).

The recipe said that the muffins were supposed to be moist and crumbly-ethereal from the buttermilk and whole wheat pastry flour, but they didn't seem that moist to me. They were crumbly, though. Not dry, but not my idea of moist, either. Surprisingly, even after all the peanut butter, it wasn't so sweet (I used half the amount of sugar required). Must be the brand of PB I was using. I was worried picky eaters who need their sugar high won't like them, so I quickly whipped up the accompanying peanut butter glaze, but using only 2 tsp of confectioner's sugar instead of 3 tsp. The glaze was sweet enough, and I drizzled that over the muffin tops as decoratively as I could.


Nyan said that it was like biting into a Reese peanut butter muffin. She asked if I made the glaze myself. Ate Nhor said it was ok and not too sweet, but she could taste the baking soda. Now that I think of it, I'm not sure if I've mixed up 1 tbsp of baking soda for 1 tsp... gotta be careful, though my palate isn't sophisticated enough to detect the baking soda?

Will I be making these again? Probably, if I find myself with an abundance of peanut butter. But next time, I'll probably just use the milk + calamansi juice = curdled milk sub, instead of the dubious buttermilk powder. Or maybe it's time to look for the PROPER buttermilk powder manufactured by SACO.

crumbly crumb

Saturday, March 13, 2010

Second Bake: Whole Grain Double Fudge Brownies

So today is another weekend, which meant that I was baking yet another project. This time a King Arthur Flour recipe. It's included in the Whole Grain Baking book and also in the website so I tried it out. I have to say, though I followed almost everything to a T, the result was a semi-disaster :(


First of all, the Whole Wheat Double Fudge Brownies were...okay. Okay, which means they're passable but not great. I realize now that my tastebuds have become so demanding that almost anything I would come up with would not meet my expectations. I'm starting to think now that the reason I thought I was an OK cook back in Japan was that back then, my standards were quite low - as long as it's edible, I could live with it. But not anymore. So, I have my work cut out for me.

I did some modifications, some to suit my tastes and some because I had no choice. Here are the changes:

1. Used 1 cup + 1/4 muscovado sugar vs. 2 cups of dark/light brown sugar. I originally was planning only 1 cup because I was putting in honeyed walnuts, but I tasted the mixed liquid ingredients and thought they were too bitter so I added some more.
2. Used 2 tsps. First Pick Nescafe Instant Coffee Powder instead of 1 tsp espresso powder. The result wasn't bad, but I think I'll stick with the recommended 1 tsp next time so the brownies wouldn't taste as dark.
3. McCormick Vanilla Flavor, as I couldn't find Vanilla extract anywhere! *sigh*
4. 5 eggs instead of 4 large eggs, since eggs here are puny. I used the conversion guide here.
5. Added honeyed walnuts.

COMMENTARY:

I used a 500-gram bar of the Tulip brand of semisweet chocolate that I chopped up into morsels - bought at SweetCraft because it was ultra cheap (about Php 80). I tasted it a bit while I was chopping. It tasted like cheapo chocolate. Personally, I wouldn't eat it even if I was paid, but I guess it was OK for trying out baking with chocolate. I was hoping the cocoa and other stuff would cancel the horrible stuff out - and yes, that was what happened. It didn't taste horrible in the final product, but I'm going to buy something better (even if it was more expensive) next time!

The book recipe, which is what I followed, called for mixing the baking powder with the liquid ingredients, while the online version called for mixing the baking powder with the flour. I think I'll stick with mixing the baking powder with the flour as an extra protection against activating the baking powder.

I think I may have overmixed the batter a tad, but nothing so major. The BIGGEST BLUNDER I did, however, was that after I had the batter and the greased pan with parchment all ready, was that I realized I didn't have the oven preheated!! What a terrible mistake!! I'm afraid the extra time waiting for the oven to heat up may have negatively affected the batter. And not only that, I think I had some oven temperature problems. Because I was in a hurry, I may not have set the oven temperature right. Due to space constraints, the thermometer was in front of the oven door, and the temperature reading may have been lower than it really was at the middle. I set the temperature at 325F (25F lower due to a darker, nonstick pan), and according to the oven thermometer, the optimum setting was between 6 and 7. However, I'm thinking I may have had better results if I set the correct temperature during preheating in the first place, and not have to bother with constant readjusting, which may have had a negative effect. I set the timer at 24 minutes (5 minutes less than the recommended time), but the edges weren't shrinking so I set it another 8 minutes. I remember that I was smelling a slightly burnt chocolate smell about 15 - 20 minutes in. After 32 minutes, I realized the edges weren't shrinking at all, and when I pulled out the pan and checked the center with a toothpick, it came out totally clean - UH-OH. I didn't care anymore about letting the brownie rest in the pan overnight. I cut it immediately as soon as the pan would allow, and my fears were confirmed - overcooked brownies with very hard edges, no thanks to the nonstick dark pans.

So now I'm stuck with brownies with very hard tops and a dense cake-like texture, kinda like a cake that has gone hard. I'm very disappointed, but I'd like to try the recipe again with new strategies. Here are the modifications I'll do next time:

Planned Modifications:
1. Mix the baking powder with dry ingredients.
2. Use better chocolate
3. Use an aluminum pan - IMPORTANT!
4. Scale the recipe for a smaller pan - the yield is too high.
5. Check the cooking time very early - maybe as early as 15 mins. Laura did say that she takes out brownies early because they continue cooking while in the pan.

Saturday, March 6, 2010

First Bake: Whole Wheat Banana Bread


When I came home this weekend, I had a lot of pleasant surprises waiting for me. I had 5 packages in! One was from Chad Lawson, who generously gave me his CD, "Set on a Hill". It's an album full of beautiful and soothing solo piano music. I'm really happy that he remembered. I wish I could give back to him in some way, but I don't know how!

My other packages were from Betterworld Books and Amazon. One of the Betterworld package came with a nice milk chocolate bar with rice crispies (Divine, a fair trade chocolate company). I munched on it while browsing my new books - it was quite good, considering that I don't really like milk chocolate anymore nowadays. Even better the next day after I put it in the fridge.

My new books were a couple of cardmaking books, Nyan's origami book, and the stars of the show, my TWO new baking books dedicated to healthier baking. One was the 2nd hand Pillsbury Healthy Baking Book, and the other one was my much-awaited King Arthur Flour Whole Grain Baking Book. I love them both, though I think the KAF book might be more practical considering that the information about whole grain baking is newer and if focuses solely on whole grains (the Pillsbury book dates from 1994), but at least the Pillsbury book has a lot of reduced fat and half-whole wheat recipes.

So I decided that after all the research and dreaming, it was time to do some BAKING! But before that, I went to Marquee Mall and shopped for MORE supplies - I have a knack for hoarding all sorts of kitchen stuff as though I was a pro and racking up huge charges in the process, since my "perfectionist" streak always gets the better of me. However, I did chance upon a lot of useful stuff, such as a silicone spatula, a nice wooden spoon, lots of Baker's Secret Pans that are affordable considering the bump in quality, and wonder of wonders - an oven thermometer! I never dreamed I'd find one in Angeles. I ended up with 800+ PHP measuring cup and spoon set, though. These babies better be worth it!

So for my first try, I chose Whole Wheat Banana Bread from the Pillsbury book, since it's a quick bread and is supposedly very forgiving. I checked the recipe vs. Laura's and the only differences are the half whole wheat flour and the salt so I went ahead and did the Pillsbury version. I have to say, I think I chose the right recipe - it is indeed very forgiving, despite the numerous blunders I made along the way.

List of blunders:
1. I melted the butter in the preheated oven. The common way to melt it is through stovetop or microwave. Still, can't the oven suffice? I was scared I might do something to the butter so I removed it while it still had a few lumps, but I don't see any adverse effect.
2. I immediately put in the sugar together with the flours. It was supposed to be mixed into the butter. I was praying it wouldn't spell disaster. Fortunately, it didn't (thanks to the forgiving recipe).
3. The butter clumped up when I put in the water into the egg-mashed bananas-butter mixture. I briefly placed it in the oven so the butter will melt a little. Thankfully, I don't notice any ill effects (see how forgiving it is?)
4. The last 1/2 banana I put in wasn't mashed properly, and as a result I see some banana bits in the bread.

List of changes made:
1. Used approx. 2/3 cup sugar instead of 1 cup.
2. Baked approximately 35 minutes at 350F instead of 55 to 65 minutes
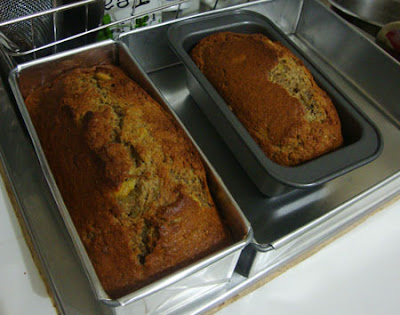
3. Used 1 mini loaf nonstick pan and 1 7" aluminum loaf pan.
4. Used 4 bananas (the lakatan were a bit on the small side; instead of 2 or 3)

I was scared I was overmixing the batter, so I tried as much as possible not to move it around too much. The banana bread wasn't dense, so maybe I did the mixing right or it was just the baking soda or the 2-time sifting. It was very nice watching the bread puff up in the oven. My oven thermometer is heaven-sent. I immediately found out that our oven is 25F off, so I adjusted the temperature - achieved a perfect 350F. However, I just couldn't make up my mind whether the bread was done or not (the crust was puffy, brown and developed early on which scared me) so I ended up bringing out and putting back the mini loaf pan into the oven. I set my timer at 45 minutes, but in the end I think I only managed barely 35 minutes due to my impatience and paranoia. But still it's a good thing, because I learned a few things:

1. Nonstick bakeware develop an nice brown crust and cook faster. According to the Baking 911 site, when cooking with glassware or darker nonstick pans, one should lower the temperature by 25F.
2. The aluminum pan loaf, though cooked a bit longer (due to not having been brought out), did not develop a crust at the sides and could have stood baking a few more minutes (maybe 45 mins. or more).
3. Nonstick bakeware are great for pound cakes due to the nice even crust. Aluminum pans are good for achivieng no-crusts.
4. Both of the cakes were easy to remove, the nonstick one a bit more so. I butter-greased the bottoms only.


Suggestions for next baking:
1. Cut the sugar to 1/2 cup, Mommy's request
2. Add more bananas (2 more, or 6 bananas total).
4. Add nuts (walnuts!)
5. Lower the temperature by 25F, increase baking time to at least 45 mins (though checking carefully after 35 mins).
6. Invest in 2 more mini loaf pans. They are a great size!
7. Thoroughly melt the butter.
8. Consider adding lukewarm water next time (prepare in advance, and not from the tap!)

Others:
1. Buy some baking gloves
2. Get a flour sifter, so the flour doesn't fly all over while sifting.

All in all, I'm still very pleased with my first try. The gods (or GOD), must be smiling down on me today :) I can't wait to bake more next week! :D